How to Prevent Laptop Backpack Shoulder Straps From Tearing in Production
Laptop backpack shoulder straps usually fail because the attachment structure does not distribute the load effectively—not simply because the thread or outer fabric is too weak.
For brands, buyers, and product developers, prevention starts with the complete load path: how force moves from each shoulder strap through the stitching, reinforcement, back panel, and bag body. Strap insertion depth, reinforcement layout, stitch construction, material compatibility, sample testing, and bulk-production control all affect the result.
A visible bar tack can look strong while the fabric underneath is already overloaded. Conversely, a well-designed attachment may use several structural seams and hidden reinforcement without relying on one prominent external stitch pattern.
This guide explains how to identify the real causes of shoulder-strap failure and how to reduce the risk during design, sampling, testing, production, and inspection.
Provide sufficient effective insertion depth and secure the structural layers defined by the load path
Body fabric tears around the anchor
Spread the load over a larger, stable reinforced area
Structural stitching breaks
Match the thread, needle, stitch formation, and seam construction to the materials
Fabric tears along needle holes
Avoid unnecessarily dense stitching, repeated needle penetration, and excessive backstitching
Strap repeatedly bends below the anchor
Create a smoother transition between stiff and flexible areas
Adjustment webbing slips
Match the webbing construction and thickness to the buckle
Left and right straps perform differently
Control placement, angle, seam allowance, and reinforcement position during production
Bulk units differ from the approved sample
Inspect hidden components before the back panel is closed
Why Do Laptop Backpack Shoulder Straps Tear?
A laptop backpack carries a concentrated and sometimes uneven load. The computer, charger, power bank, documents, water bottle, and other daily items can place repeated stress on the upper strap anchors whenever the user lifts, swings, wears, or puts down the bag.
Strap failure usually develops through a combination of factors rather than one isolated defect.
The load is concentrated in a small area
If the shoulder strap transfers its load into only a narrow strip of outer fabric, stress becomes concentrated around the stitch line. The attachment may survive a short static test but weaken after repeated movement.
The objective is not merely to make the strap itself stronger. The construction must distribute force into a sufficiently large and stable area of the back-panel structure.
The strap does not extend far enough into the seam
The visible end of a shoulder strap may enter the top seam, but its effective insertion depth can still be inadequate. A shallow insertion leaves less material available to resist pulling and makes the construction more sensitive to small sewing variations.
Insertion depth and seam allowance are related but different measurements:
Insertion depth describes how far the strap extends into the attachment structure.
Seam allowance describes the distance between a fabric edge and its seam line.
Both should be defined in the tech pack and checked on the sample.
The reinforcement is too small or incorrectly positioned
A reinforcement layer can help spread the load, but only if it is located where the force actually travels. A patch placed beside the critical stitch line may add bulk without supporting the anchor.
Its area, direction, stiffness, edge shape, and connection to the back-panel assembly all matter. An excessively stiff patch can also create an abrupt transition, moving stress to the edge of the reinforcement instead of solving it.
The outer fabric fails before the stitching
Sometimes the bar tack remains intact while the surrounding fabric tears. This usually indicates that the stitch pattern is stronger than the material area carrying the load.
Possible causes include:
A reinforcement area that is too small
Fabric with insufficient tear resistance for the construction
Excessive stitch density
Repeated backstitching in the same area
Needle damage during sewing
A rigid reinforcement edge that concentrates stress
Adding more stitches to the same small area can make this problem worse.
The stitching or thread fails
Thread breakage can result from an unsuitable thread specification, poor stitch balance, abrasion, damaged needles, sharp hardware, inconsistent tension, or a seam design that places too much force on a limited number of stitches.
Stronger thread alone is not a complete solution. The thread, needle, stitch type, stitch density, fabric, webbing, foam, and reinforcement must work as one construction.
The lower webbing or adjustment hardware slips
Not every shoulder-strap complaint begins at the upper anchor. The lower webbing may slip through the buckle, fray at a cut edge, or wear where it contacts hardware.
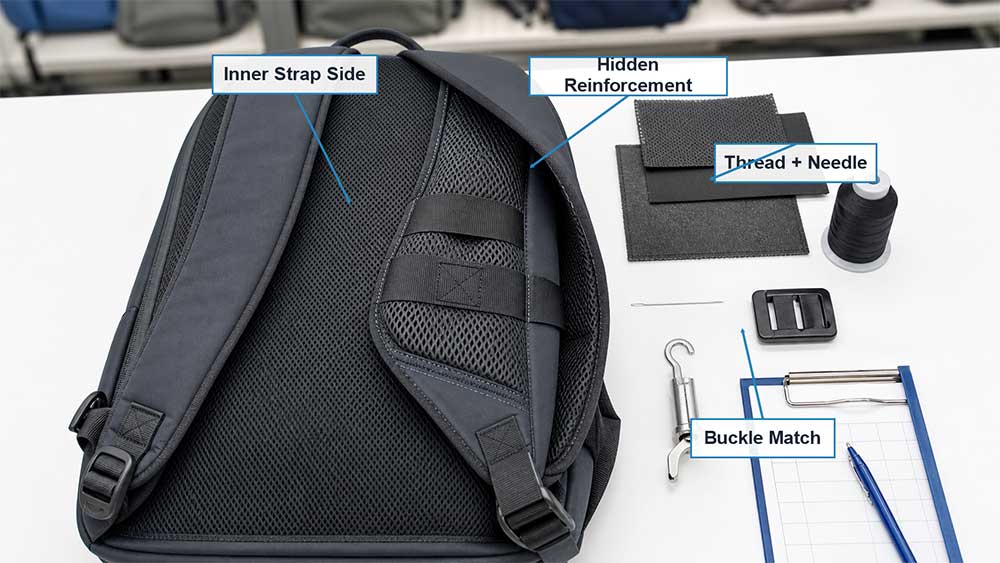
The buckle geometry must suit the thickness, width, weave, and surface of the webbing. A mismatch can allow gradual slippage even when neither component looks visibly defective.
Design the Complete Load Path
The most reliable way to prevent tearing is to treat the strap attachment as a load-transfer system rather than an isolated sewing operation.
The path may include:
Shoulder-strap outer fabric and internal webbing
Strap-end seam or attachment tab
Structural stitching
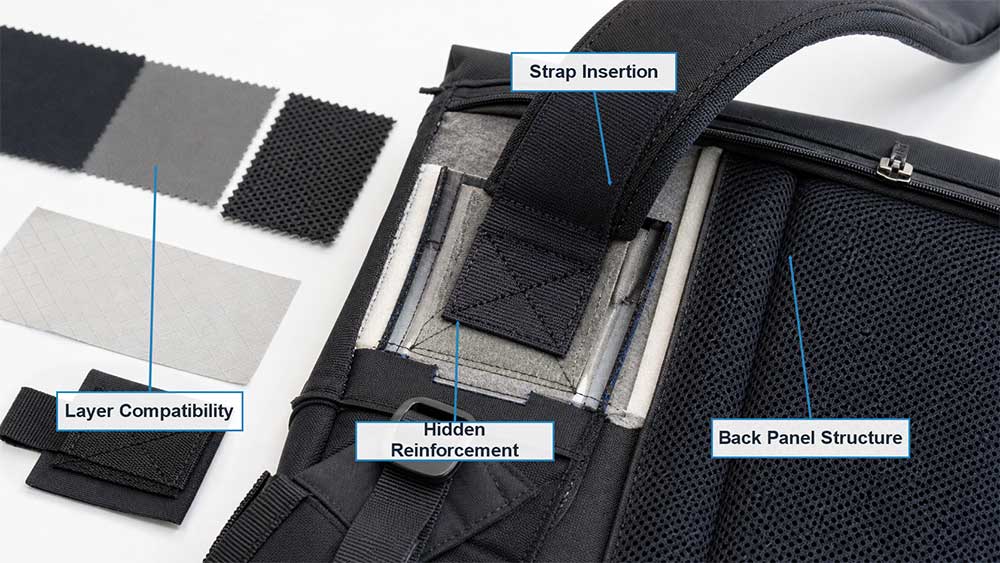
Hidden reinforcement layer
Back-panel fabric and padding assembly
Adjacent top or side-panel seams
Lower adjustment webbing and buckle
A change to one part may move stress to another. For example, strengthening the bar tack without increasing the supported fabric area may cause the body fabric to tear beside it. Adding a very stiff patch may prevent movement at the anchor but increase repeated bending directly below it.
The whole assembly must therefore be evaluated on a completed backpack.
Select Materials as a Compatible System
High-denier fabric does not automatically produce a strong shoulder-strap attachment. Coating, weave, lamination, tear resistance, needle response, reinforcement structure, and seam construction can matter as much as the nominal fabric specification.
Outer and lining fabrics
The back-panel fabric must tolerate both sewing and repeated loading. Buyers should consider:
Depending on the design, reinforcement may use woven fabric, webbing, synthetic sheet material, nonwoven material, or a layered construction. The best option depends on the target load, flexibility, seam design, thickness, cost, and production method.
A suitable reinforcement layer should:
Cover the intended load-transfer area
Remain stable during sewing
Resist tearing around stitch holes
Avoid excessive bulk in the seam
Maintain an appropriate transition in stiffness
Be positioned consistently in bulk production
Foam and shoulder-strap structure
Foam improves comfort and shape, but it should not be treated as the main load-bearing component unless the construction has been specifically designed that way.
The strap usually needs a structural fabric or webbing element that continues through the attachment area. Foam thickness should also be controlled because excessive compression or uneven trimming can affect stitch formation.
Webbing and buckles
Webbing should match the buckle in width, thickness, weave, surface texture, and stiffness. The cut end must be finished appropriately for the fiber and construction, then secured so it cannot pull back through the seam.
Hardware edges and contact points should also be checked for abrasion.
Bar Tack or Box-X Stitching: Which Is Better?
Neither stitch pattern is automatically superior. The correct choice depends on the attachment geometry, available sewing area, material stack, load direction, and intended use.
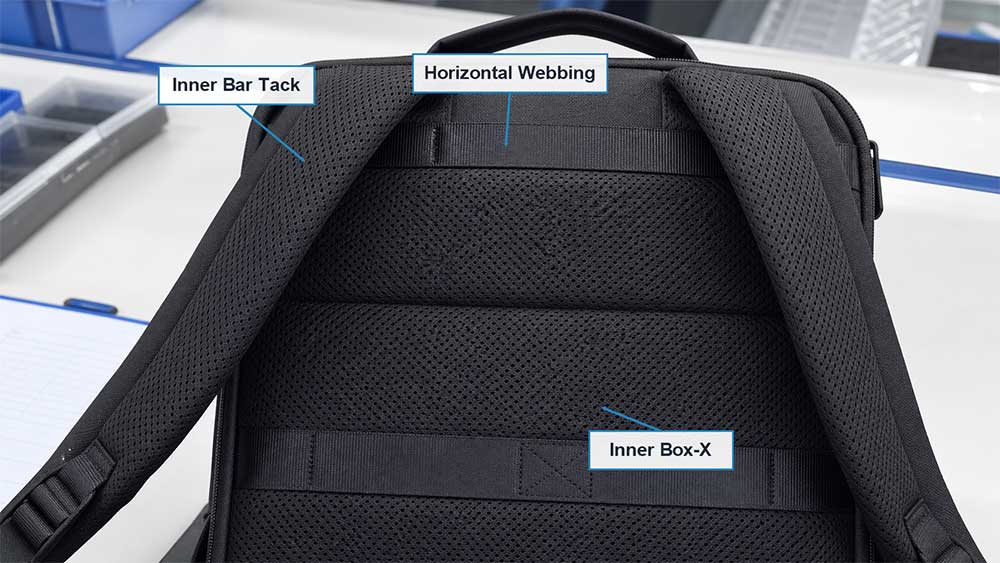
Bar tack stitching
A bar tack places a dense group of stitches across a small area. It can be effective for securing webbing ends or reinforcing a defined load point when:
The supporting material area is adequate
The stitch direction suits the load
The needle and thread match the material stack
Stitch density does not perforate or weaken the fabric
The specified layers are captured consistently
If a bar tack is intended to anchor the shoulder strap directly to an internal reinforcement layer, it must pass through the specified structural layers. A visible bar tack that catches only the outer fabric may provide limited reinforcement unless another documented load-transfer structure supports it.
Box-X stitching
Box-X stitching—also called box-and-cross stitching—distributes stitches over a broader area. It can be useful when the strap tab or webbing provides enough space and the underlying materials can support the pattern.
However, it is not automatically stronger. A Box-X pattern sewn over weak fabric, a small unsupported patch, or an unsuitable material stack can still fail.
Combined construction
Some designs use a seam attachment together with a bar tack, Box-X pattern, or secondary reinforcement stitch. This may improve load distribution, but adding stitch patterns without understanding their function can create excessive needle holes or unnecessary stiffness.
Each structural stitch line should engage the material layers defined by the intended load path.
Avoid Stitching That Weakens the Material
More stitches do not always mean more strength.
Very dense stitching can create a line of closely spaced needle holes, especially in coated, laminated, or tightly woven fabrics. Under load, the fabric may tear along this perforated line.
Production should control:
Needle type and size
Thread specification
Stitch type
Stitch density
Thread tension and stitch balance
Presser-foot pressure
Backstitching and repeated needle penetration
Seam allowance
Operator handling through thick areas
Needles should be replaced when damaged, blunt, or unsuitable for the material stack. The thick transition where a padded strap enters the back panel deserves particular attention because skipped stitches, deflection, and inconsistent feeding are more likely there.
What Should the Tech Pack Specify?
Instructions such as “reinforce the shoulder straps” are too vague for sampling or bulk production.
The tech pack should define the construction in measurable and inspectable terms.
Control point
Information to specify
Strap geometry
Finished width, shape, angle, spacing, and left-right position
Attachment
Effective insertion depth, seam allowance, and stitch location
Reinforcement
Material, dimensions, orientation, position, and number of layers
Stitching
Stitch type, pattern, density range, thread, and critical dimensions
Structural layers
Which layers each critical seam or reinforcement stitch should engage
Webbing
Fiber, width, thickness or approved reference, weave, and end finish
Buckle
Approved component and webbing compatibility
Tolerances
Acceptable variation in strap position, angle, symmetry, and construction
Testing
Approved loading method, duration or cycle, conditioning, and acceptance criteria
Inspection
Required in-process and final checks, including hidden-structure checkpoints
These details should be confirmed during the laptop bag sampling process rather than left until bulk production begins.
Evaluate and Test the Complete Sample
A sample should be reviewed both before and after testing.
Before testing, confirm:
Strap placement and symmetry
Effective insertion depth
Reinforcement dimensions and location
Whether the intended structural layers are secured
Stitch formation and tension
Absence of skipped stitches, broken thread, needle damage, and uncontrolled puckering
Compatibility between webbing and adjusters
Smooth transition from the anchor into the flexible part of the strap
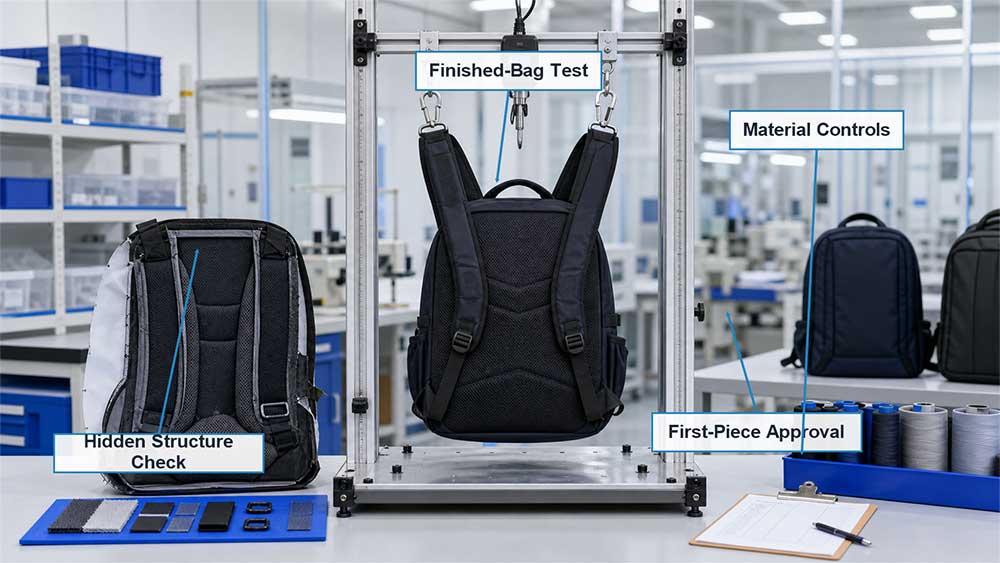
Hidden structures may require process photographs, a partially assembled reference sample, or destructive examination of a retained unit. External appearance alone cannot confirm the reinforcement inside a closed back panel.
Separate component tests from finished-bag tests
Material, seam, webbing, buckle, and finished-product tests answer different questions.
ASTM D1683/D1683M-22 measures sewn-seam strength in woven fabrics under force applied perpendicular to the seam and can help identify seam rupture or slippage. ASTM also states that the method does not predict actual wear performance. It should therefore be treated as a component-level test, not as proof of complete backpack durability.
A finished-bag test is still necessary because it evaluates the interaction among the straps, back panel, reinforcement, seams, buckles, and actual load distribution.
Use a realistic internal load
A finished backpack should be loaded in a way that reflects its intended capacity and compartment arrangement. Concentrating all weight in one point may create an unrealistic failure mode, while an unrealistically light or evenly distributed load may hide a weakness.
The approved method should define:
Total load and its distribution
How the bag is lifted or suspended
Whether force is static, repeated, or dynamic
Test duration or number of cycles
Conditioning requirements
Failure and acceptance criteria
Whether testing applies to one strap, both straps, or the complete carrying system
There is no universal load value suitable for every laptop backpack. Requirements should be based on product size, intended use, buyer specifications, risk level, and applicable test protocols.
Investigate the failure mode, not only the test result
When a sample fails, record exactly what happened:
Failure mode
Likely area to investigate
Strap pulls out cleanly
Insertion depth, seam capture, stitch location, and assembly consistency
Thread breaks
Thread, needle, tension, abrasion, stitch pattern, and load concentration
Fabric tears beside intact stitching
Reinforcement area, material resistance, stitch density, and stiffness transition
Tear begins at the reinforcement edge
Patch size, edge shape, position, and stiffness change
Webbing slips through the buckle
Webbing thickness, weave, surface, buckle geometry, and threading
Strap bends or cracks below the anchor
Excessive stiffness, foam transition, strap geometry, and repeated flexing
One side fails first
Strap angle, symmetry, sewing variation, or uneven load distribution
After changing the weak point, test the complete backpack again. A modification may transfer the load to another component.
Control Critical Details During Bulk Production
The approved sample is useful only if its hidden construction and critical dimensions can be repeated consistently.
In-process control should focus on:
Reinforcement material and dimensions
Reinforcement orientation and placement
Strap insertion depth
Seam allowance and stitch location
Strap angle, spacing, and symmetry
Correct material layers captured by structural stitching
Thread, needle, stitch formation, and density
Webbing end security
Webbing and buckle compatibility
Operator handling through thick attachment areas
A checkpoint should be scheduled before the back panel is closed. At that stage, inspectors can verify reinforcement and strap insertion directly. Once the structure is sealed, many of these details cannot be confirmed without opening the product.
First-piece approval at the start of a production line or after a material, machine, operator, or construction change can help identify variation before it affects a larger quantity.
What Can Final Inspection Confirm?
Final inspection should not be expected to replace in-process control. It can confirm visible workmanship and selected functional performance, but it usually cannot verify every hidden layer.
Final checks may include:
Strap position, angle, and symmetry
Visible stitch pattern and workmanship
Loose, skipped, damaged, or broken stitches
Fabric damage around the anchor
Webbing adjustment and slippage
Buckle operation and edge condition
Strap shape and padding consistency
Defined pull, suspension, or functional checks
Comparison with the approved sample and specification
If bulk units fail in the same location, the issue should not be treated as an isolated cosmetic defect. Production records, reinforcement placement, sewing parameters, material lots, samples, and test results should be reviewed together. Similar recurring defects may also be evaluated alongside other common laptop bag manufacturing defects.
Shoulder-Strap Failure Prevention Checklist
During design and development
Define the intended load and carrying conditions
Map the load path through the strap, anchor, reinforcement, and back panel
Select compatible fabrics, reinforcement, webbing, thread, and hardware
Specify measurable construction details and tolerances
Avoid abrupt stiffness changes near the anchor
During sampling
Check insertion depth, reinforcement position, and material layers
Compare left and right strap geometry
Review stitch formation through thick areas
Test components where relevant
Test the complete loaded backpack and document the failure mode
During bulk production
Approve the first production pieces
Verify hidden construction before the back panel is closed
Control needles, thread, stitch formation, and operator handling
Monitor strap placement and reinforcement consistency
Recheck after material, machine, operator, or construction changes
Before shipment
Compare selected units with the approved sample
Inspect visible anchor stitching and surrounding fabric
Check webbing adjustment and buckle function
Complete the agreed functional or load checks
Retain inspection and test records
Conclusion
Preventing laptop backpack shoulder straps from tearing is not simply a matter of using thicker fabric, stronger thread, or more bar tacks. The attachment must distribute the load from the strap into a sufficiently large and stable part of the back-panel structure.
Reliable performance depends on a compatible combination of materials, effective strap insertion, correctly positioned reinforcement, controlled stitching, suitable webbing and buckles, realistic finished-bag testing, and consistent bulk production.
For custom projects, Vancharli Outdoor supports laptop backpack development and production based on mutually agreed construction details, reinforcement methods, testing procedures, tolerances, and inspection requirements.
The strongest-looking stitch pattern is not always the most reliable construction. What matters is whether the complete load path has been designed, tested, documented, and reproduced correctly.
Frequently Asked Questions
Does every laptop backpack shoulder strap need a bar tack?
No. A bar tack can be useful, but the appropriate construction depends on the materials, attachment geometry, load path, and intended use. Some designs use seam assemblies, Box-X stitching, hidden webbing, or combined reinforcement methods.
Why can the fabric tear while the bar tack remains intact?
The bar tack may be stronger than the surrounding material area. If the reinforcement is too small, incorrectly positioned, or excessively stiff, the load may concentrate around the stitch holes or reinforcement edge and tear the fabric.
Can a static hanging test prove long-term strap durability?
No. A static test provides information about one loading condition but does not fully represent repeated lifting, swinging, walking, flexing, or uneven loading. The testing plan should reflect the backpack’s intended use and risk level.
How can buyers check hidden strap reinforcement during production?
The most practical approach is to inspect the reinforcement before the back panel is closed. Process photographs, first-piece approval, partially assembled reference samples, or destructive examination of retained units may also be used when agreed in advance.
Does thicker reinforcement always make the attachment stronger?
No. A thicker or stiffer reinforcement can spread load, but it may also create bulk or an abrupt stiffness transition. Material, area, orientation, edge shape, and connection to the surrounding structure all matter.
What should a buyer do if several users report tearing in the same location?
Record the failure position and pattern, isolate affected lots where appropriate, and compare returned products with approved samples and production records. Review reinforcement placement, strap insertion, sewing parameters, material lots, webbing, hardware, and test results before deciding on corrective action.











Comments are closed