


How to Design a Waterproof Bag for RF Welding
Designing a waterproof bag for RF welding is not simply a matter of replacing stitched seams with welded seams.
The factory must be able to lay each joint in the machine, reach it with the welding tool, and assemble the panels in an order that leaves a practical way to close the bag. Handles, pockets, zippers, and other features also need to be added without putting needle holes through the protected compartment.
Before approving the design, answer four questions:
- Which compartment must stay dry?
- Can the shape be built from panels that are practical to weld?
- Can the welding tool reach every seam?
- Which seam will close the bag last?
If one of these questions remains unanswered, the design may look complete on screen but still need major changes during sampling.
Why a Sewn-Bag Pattern Cannot Simply Be Welded
Sewing and RF welding create connections in different ways.
A sewing machine can join curved panels and work around a partly assembled three-dimensional bag. An RF welding machine usually needs the material to lie between a metal welding tool above and a supporting surface below.
This changes how the bag must be divided into panels.
A curved seam that is easy to sew may be difficult to lay flat for welding. A narrow opening may leave no room for the tool. A pocket or zipper installed too early may block the next seam.
For this reason, converting an existing sewn bag often requires more than changing the seam allowance. The factory may need to:
- Move a seam to a more accessible position
- Divide one complicated panel into simpler parts
- Change which panel overlaps another
- Build handles or pockets as separate subassemblies
- Select a practical final closing seam
The goal is to keep the intended shape while making every seam accessible and repeatable in production.
Start With the Compartment That Must Stay Dry
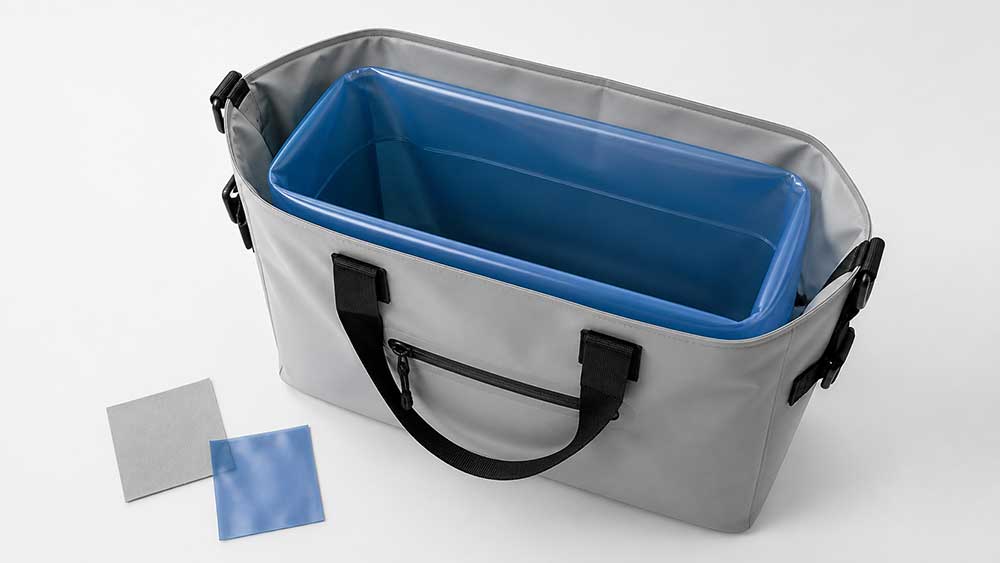
Before drawing the individual panels, decide which compartment must prevent water from entering.
Think of this protected area as one sealed chamber. The body material and all the connections around it need to remain continuous.
Stitching, rivets, zipper ends, valves, and attachment points can become leakage paths if they pass through this chamber without a suitable sealed construction.
It helps to separate the bag into three areas:
| Area | What it does | What the design must protect |
|---|---|---|
| Waterproof chamber | Holds the contents that must stay dry | No unsealed stitching or hardware should pass through it |
| External attachment area | Carries handles, straps, pockets, and buckles | Components may be sewn if the stitching stays outside the chamber |
| Closure area | Allows the user to open and close the bag | The closure must connect continuously to the waterproof body |
This also prevents a common misunderstanding: welded seams do not automatically make the complete bag waterproof under every condition.
The material, closure, accessory interfaces, and finished construction all matter. A bag intended for rain exposure may need a different design and test from one intended for temporary immersion. Agree on the real use condition before developing the final structure.
The materials inside each functional weld must also be compatible with the selected process. This should be confirmed with material information and trial welding before tooling. A more detailed explanation is available in this guide to how high-frequency welding works.
Divide the Bag Into Panels That Can Be Welded
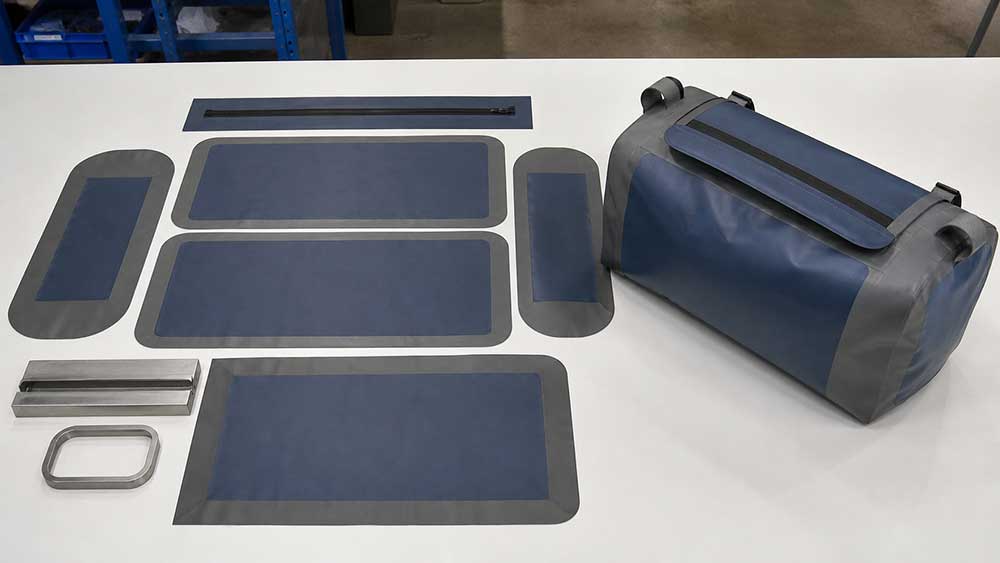
A product rendering shows the final three-dimensional shape. The factory has to work backward and decide how to create that shape from flat pieces.
For every panel connection, ask:
- Can this area lie flat enough for the machine?
- Which panel sits on top at the overlap?
- Is there enough clear space around the weld?
- Will another component block this area later?
- Can the operator hold the panels in the correct position?
- Will the overlap reduce the usable space inside the bag?
Consider a shaped side panel on a waterproof duffel. Its outline may look simple in a rendering, but the factory still has to join it to the front, back, base, and possibly the zipper section. Each connection must be accessible at the point when it is welded.
The easiest design is not always the one with the fewest panels. Sometimes dividing a complicated section into two parts creates a more practical welding and assembly process. In other cases, an unnecessary decorative seam adds tooling and positioning work without improving the product.
The designer and factory should therefore review the panel layout together before the final pattern is approved.
Remember the Difference Between Outside and Inside Size
Panel overlaps, folded corners, closure depth, and reinforcements all use space.
A bag can meet its external dimensions but still be too small inside for the intended item. If the product needs to hold a specific device, container, case, or piece of equipment, include the required usable internal dimensions in the tech pack.
Do not rely only on the stated length, width, and height of the outside of the bag.
Make Sure the Welding Tool Can Reach Every Seam
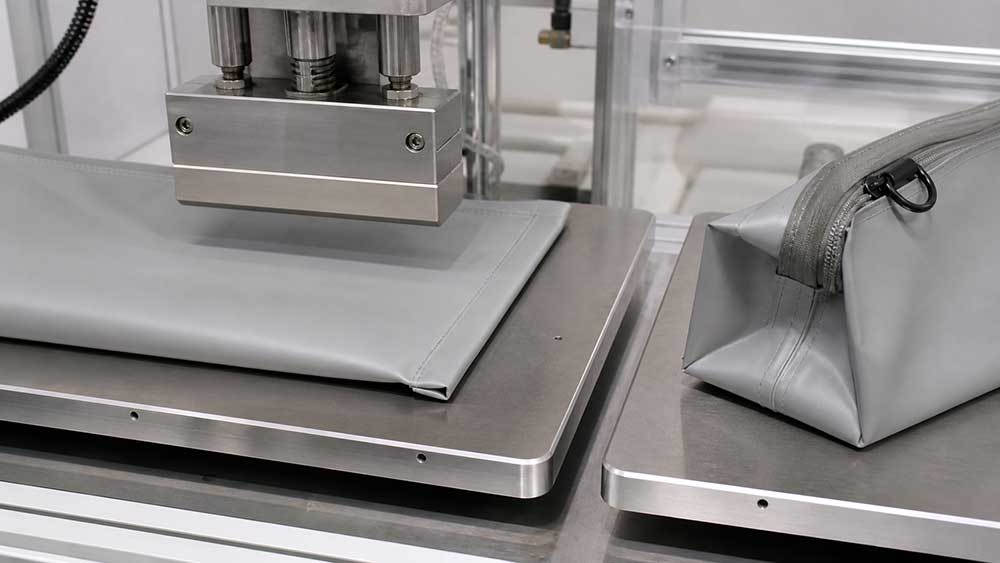
During RF welding, the material is pressed between a metal tool and a supporting surface. If the partly assembled bag cannot fit correctly between them, the seam may not be weldable as drawn.
This is easier to understand with a simple example.
Suppose a stiff base panel and a zipper have already been installed. The next seam sits deep inside a narrow corner. Even though the line is visible on the drawing, the operator may no longer be able to lay it flat or support it from below.
That is why every seam should be reviewed in its actual production stage—not only as a line on a flat pattern.
Pay particular attention to:
- Deep side gussets
- Narrow bag openings
- Corners close to zippers or stiffeners
- Seams surrounded by handles or hardware
- Areas that become enclosed early
- Intersections where several material layers meet
The last point is easy to miss. A normal joint may contain two material layers. At a corner, the body panel, gusset, folded edge, and reinforcement patch may all overlap. This creates a thick, uneven area that is harder to position and press consistently.
Where possible:
- Move reinforcement edges away from main seam intersections
- Avoid placing several folds at the same corner
- Stagger the ends of nearby seams
- Keep decorative patches away from functional welds
- Use a cross-section to show how many layers meet
There is no single weld allowance or corner construction that suits every bag. The required space depends on the material, tooling, and product structure. It should be confirmed during the factory’s design-for-manufacturing review and trial welding.
The High Frequency Welding Handbook from TWI provides a technical explanation of the role of tooling, pressure, machine settings, and material preparation. For a buyer or designer, the practical takeaway is simple: every weld line on the drawing must also be physically accessible in the machine.
Decide What Gets Welded First—and What Closes the Bag Last
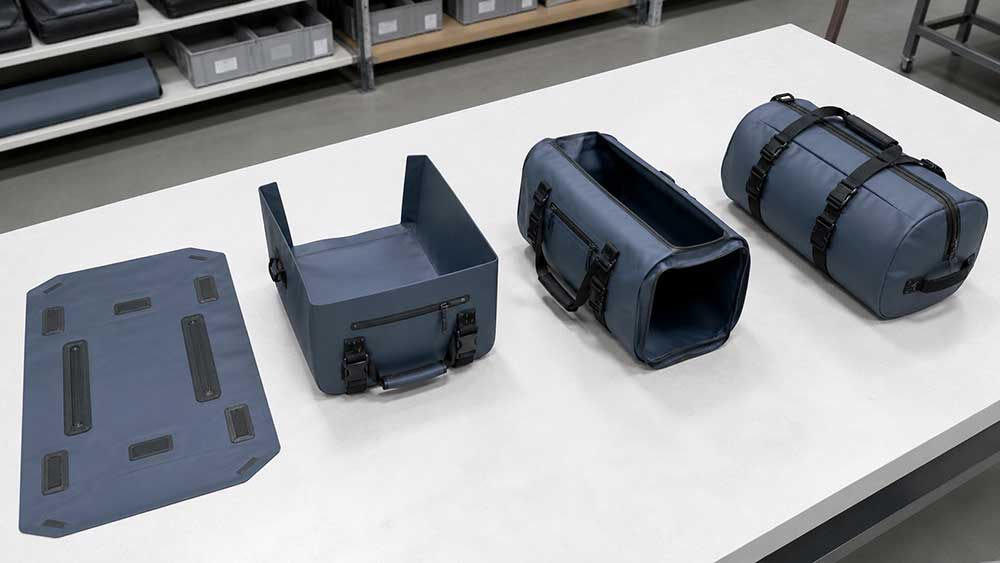
The order of assembly can determine whether the bag can be completed.
Imagine that the zipper, handles, side panels, and base have all been installed. If the only remaining seam is now inside a narrow, partly closed bag, the welding tool may no longer be able to reach it.
The components may all be suitable individually. The problem is that they were installed in an order that trapped the final operation.
Before tooling begins, decide:
- Which reinforcement patches are welded to flat panels first
- When handles, straps, pockets, or valves are installed
- When the main body starts to take shape
- Which components still require access from both sides
- Whether the bag needs to be turned
- Which seam closes the waterproof chamber last
A possible production sequence might be:
- Apply approved printing while the body panels are flat.
- Prepare the handle, pocket, zipper, or valve subassemblies.
- Weld reinforcement patches onto individual panels.
- Join the main body panels.
- Form the sides, ends, or base.
- Install any remaining components that require open access.
- Close the last functional seam.
- Complete external work that does not puncture the chamber.
This is not a universal production sequence. A backpack, duffel, dry bag, and waterproof pouch may all require a different order.
What matters is that the sequence is reviewed before the pattern and welding tools are treated as final.
Add Handles, Pockets, and Closures Without Creating Leaks
A waterproof bag still needs useful features. The challenge is attaching them without damaging the sealed chamber or blocking the welding process.
Handles and Shoulder Straps
Do not sew a load-bearing handle directly through the waterproof body unless the penetration is part of an approved sealing method.
One possible alternative is:
- Stitch the webbing to a separate reinforcement patch.
- Keep the stitch holes inside that patch.
- Weld the larger patch to the outside of the bag body.
When properly designed and validated, this type of welded patch can distribute the pulling force over a larger area while keeping the stitching outside the waterproof chamber.
Its material, size, shape, weld position, and load direction must be reviewed for the actual bag. Also check that the patch does not overlap a main body seam or create an excessively thick corner.
This is one possible attachment method rather than a fixed construction for every waterproof bag. The final solution should be confirmed through sampling and appropriate load and waterproof checks.
Exterior Pockets
A sewn exterior pocket can be used on an RF-welded bag if its stitching does not enter the protected chamber.
Depending on the design, the pocket may be:
- Attached to a separate welded carrier panel
- Built as a removable component
- Made as its own welded subassembly
The right choice depends on whether the pocket itself needs to be waterproof, how much weight it will carry, and how it connects to the main body. The factory should review the construction before the pocket and surrounding welds are finalized.
Zippers and Roll-Top Closures
A closure must be designed as part of the bag body, not added after all the surrounding panels are finished.
For a zipper, check:
- How its flange connects to the body
- How the ends are closed
- Whether the slider or hardware blocks the tool
- When it should be installed
- Whether the opening still works after the bag is loaded
For a roll-top, leave enough flexible material above the main compartment for the opening to align and roll correctly. Thick handles, reinforcement patches, or stiff parts near the top can interfere with closure.
If the project has not yet selected a closure, this comparison of roll-top and zipper-seal waterproof bags explains their different uses. This article assumes the closure has already been selected and focuses on making its connection manufacturable.
Valves, transparent windows, cable openings, and molded fittings need the same type of review. Choosing the component is only the first step; the surrounding connection and installation order still need to be designed.
Show the Welding Structure Clearly in the Tech Pack
A finished rendering is not enough for an RF-welded bag. The factory also needs to see how the product is assembled.
At minimum, the tech pack should show:
| Information | What the factory needs to understand |
|---|---|
| Waterproof chamber | Which area cannot be punctured by unsealed stitching or hardware |
| Panel layout | The shape and material orientation of each part |
| Weld locations | Where the functional connections begin and end |
| Overlap direction | Which panel sits above or below at each joint |
| Attachment construction | How handles, pockets, closures, and hardware connect |
| Assembly order | What is installed first and which seam closes the bag last |
| Critical dimensions | Both the external size and the required usable internal space |
Use cross-sections or exploded details when several parts meet in one place. Numbering the main welds can also make the assembly order easier to discuss.
Trial welding may show that an overlap, corner, or attachment position needs adjustment. Any approved change should then be added to the drawings before production so the production team is not working from an outdated structure.
Confirm Project-Specific Details Before Final Tooling
The examples in this guide explain the design logic behind an RF-welded waterproof bag. They do not prescribe one production method for every product or factory.
The following details must be confirmed with the selected materials, equipment, tooling, and approved sample:
- Panel overlap and welding allowance
- Welding-tool and fixture design
- Reinforcement material, size, and position
- Welding power, pressure, time, and cooling settings
- Attachment construction
- Assembly and final closing sequence
- Dimensional tolerances
- Load and waterproof acceptance criteria
These details can change with the bag shape, material thickness, coating, machine capacity, tooling method, intended load, and required water protection.
A useful DFM review should therefore happen while the main structure can still be changed.
Before approving the final pattern and welding tools, check that:
- The waterproof chamber is clearly defined.
- No ordinary stitching or hardware punctures that chamber.
- Every panel can be positioned for welding.
- The tool can reach and support every functional seam.
- Thick corners and multi-layer intersections have been reviewed.
- Handles and straps use a suitable attachment structure.
- The closure has enough room to be installed and operated.
- The full assembly order has been discussed.
- The final closing seam has been identified.
- Usable internal dimensions have been confirmed.
- Sample changes will be added to the final tech pack.
Once the construction has been approved, the next step is to verify that the factory is producing the agreed welds consistently. This separate guide explains how to inspect RF-welded seams before bulk production.
Inspection confirms whether the approved design has been executed correctly. It cannot solve a seam that the machine was never able to reach in the first place.
Bring the Factory Into the Project Early
The most useful time to identify an inaccessible seam, crowded corner, or impractical attachment is before the final pattern and welding tools are approved.
Vancharli Outdoor works with brands and procurement teams to review waterproof bag concepts, panel layouts, attachments, samples, and production requirements. If you are developing a dry bag, waterproof backpack, duffel, pouch, or soft cooler, involving an experienced waterproof bag production partner early can reduce avoidable redesign during sampling.
Final Thoughts
A successful RF-welded waterproof bag begins with a structure the factory can actually build.
Define the compartment that must stay dry. Divide the bag into panels that can be positioned in the machine. Make sure the tool can reach every seam, and decide what will be welded first and what will close the bag last.
Then add handles, pockets, closures, and other features without puncturing the protected chamber or blocking the next operation.
The exact construction and process settings still need to be validated with the selected materials, equipment, tooling, and approved sample. When the main design decisions are made before tooling, sampling can focus on refining the product instead of rebuilding its basic structure.
Frequently Asked Questions
Does every bag size need its own welding tool?
Not necessarily. It depends on whether the size change also changes the shape or length of the functional welds. The factory should review tooling reuse before a full size range is approved.
What should a buyer provide for the first DFM review?
Provide the product rendering, intended dimensions, items the bag must hold, preferred material, closure type, handle and pocket positions, artwork, and required use conditions. Flat drawings and reference samples are helpful if available, but the design does not need to be fully finalized.
Should the logo be applied before or after welding?
It depends on the branding method and position. Printing is often easier while the panel is flat, but the artwork should not interfere with a functional weld. Confirm the order during sampling.
Who should approve structural changes found during trial welding?
Changes that affect the panel layout, attachment method, closure, dimensions, or waterproof chamber should be reviewed and approved by both the buyer and factory. The final construction should then be updated in the tech pack and approved sample.
Is a reference sample enough to start an RF-welded bag project?
A reference sample is useful, but it may not show every internal overlap or assembly step. The factory will still need the intended dimensions, materials, closure, attachment requirements, and waterproof performance before developing a production-ready structure.



Comments are closed